Showing posts with label keeping the home. Show all posts

Monday, June 20, 2011

Super Cool Garden Project

I discovered this idea on Pinterest and set out to find a pallet. You can go to the original post, How To Turn a Pallet Into a Garden, she gives far better details than I ever could.


I am very pleased with how this turned out. I do wish I had started it earlier, I wanted to have more herbs in it and my local garden store was sold out by the time I put it together. I did dig up some thyme and marjoram out of my own garden to put in there.


P1060872


I have lettuce, Swiss chard, alyssum (white and purple), dusty miller (it was the only other kind of flower on the five dollar a flat wagon), basil, marjoram, thyme, a few fillers here and there and viola!


P1060873P1060874


Isn’t it so clever??


Let me remind those of you who have commented that I am ‘so creative’, that while I do have possibly a teeny bit of God given creativity, most of it is copied from other people, and I am okay with that.

PS: This is Brian, and I would like to point out that Michelle is currently battling the enemy and his lies.(note the previous paragraph)  As you woman know, she is extremely creative and wonderfully talented in many areas.

Monday, June 13, 2011

How To Harvest Basil

With Summer nearly upon us, I thought it would be helpful to repost this very popular post on How to Harvest Basil. It is one of my posts that receive the most hits. Enjoy.


In this post I have a few photos trying to show how I harvest basil. I also have a video explaining the process. This Perfect Pesto recipe is what I use.


I plant tons of basil plants each year because we LOVE Pesto! Pesto Pizza, Pesto Pasta, Pesto Focaccia . . . Oh my!


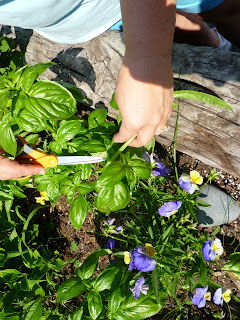
I have found if I keep the basil plants harvested frequently it keeps them from getting 'leggy' and also from going to seed. I get a drastic reduction in basil if I just let the plant go. Just about every week or as often as I need it, I go through all my plants and pick all the leaves I can.


It might be hard to tell in the picture, but my scissors are just about the snip the stem right at the base of a newer set of leaves. Can you see them?


It is so easy to do. Find a 'leaf cluster' and follow the stem down. You are looking for where the leaves branch out and are starting a whole other set of leaves. I try to go as far down the plant as I can to keep it stocky and bushy. Don't ever clip the stem where there is no other set of new leaves, it will stop producing. Your goal is bushy with lots of new leaf sets growing.


Here is another shot of the base of the stem with the new leaves on either side.


Have you discovered the delightful taste of basil? Do you grow basil? What do you use it for?


Sunday, June 12, 2011

Cheap and Easy “Chalkboard” Labels


  1. Go here to download the chalkboard font called, “Eraser”
  2. Open the zip folder with the font and double-click the font file
  3. When the font file opens, click “Install” This will install the font in your systemimage
  4. Open Microsoft Excel
  5. Type each label you want in a column of cellsimage
  6. Select all the cells with your labels in themimage
  7. Change the font to “Eraser”image
  8. Change the font to the size desiredimage
  9. You will need to adjust the cell size to fit the textimage
  10. Change the fill color to blackimage
  11. Change the font color to whiteimage
  12. Print the selection

image

13.  Cut out each “label” and tape to your item to be labeled. 

I use 3M Packing Tape for just about everything!  If I am labeling a jar I just tape the ‘label’ to the jar.  If I am taping it to a basket or going to attach it with a ribbon, I ‘laminate’ the label with my packing tape and then attach it.  Does that makes sense?

One tip to save on printer ink is to only make the label the size you need.  You don’t want to print up a lot of extra black!

If you have any questions, please feel free to ask.  I will submit your questions to my wonderful ‘tech support’, the one who did this wonderful post for me!  Thanks Josh.

Friday, May 27, 2011

More Spring Projects


This Spring has been all about organization and projects!  I love it.  Due to health issues and coming out of a very difficult season in life, if feels delightful to be able to do the things I love.  One of which is ORGANIZING!  I am awful at taking ‘before’ pictures as I am usually in a snit fit to get organizing that I don’t want to stop to take a picture.  Sorry, it really would be more dramatic with a before and after photo.

In our bathroom I put these cute, cheap matching baskets in Brian and my drawers.  I spray painted the little tins that hold the nail clippers and Q-tips.  I painted them black.  I found this really cool shelf liner paper.  I adore black and white right now.  So clean and crisp.  Don’t you think?

P1030610

This is my drawer.  I purged tons of old make-up products that I kept for . . . for what, I don’t know. Winking smile  I even lined my box and baskets with the pretty black and white shelf liner, just for the “pretty factor”.  It makes all the difference in the world, for me, to have small baskets to keep things in.  If I just have one big basket I throw them every which way.

P1030612

Moving on to our bedroom closet.  If you knew what was on these shelves for ten years you would know why it thrills me to see this closet!  I leave the doors open sometimes just for fun!  I had the big white baskets from a kitchen makeover about 6 years ago that I never used.  They were perfect.  I put an extra shelf in to use up as much space as I could.  The other baskets were from the Dollar General.

P1030615

I even replaced the mismatched baskets above Brian’s side of the closet with matching white ones.  We keep things in there that we don’t need that often, as it is quite a reach.

P1030616

Now, for the back bathroom!  I so wish I had before and after pictures!!  This was my nemesis for years.  I never could figure out what to do with these cabinets and above them.  It was always a mess.  Now it looks so nice!!  They are the cabinets above the washer and dryer.

In the baskets I have extra rolls of packing tape (the down side to buying in bulk) and light bulbs.  I made cute little labels for them, ‘laminated’ them and tied them with a ribbon.

P1030620

Behind the door on the right are the laundry products. It just so happened to work out that the laundry detergent I use comes in a white container.  (yeah!)  I removed the label from the bleach and replaced with my fancy ‘chalk board’ labels.  I put the Downy in a quart jar because we only use Downy on Saturdays for our sheets.  (I still love the smell of fresh Downy sheets)  No sense having the super huge Costco size bottle taking up space, that is down stairs in the storage room.  (I should show you that sometime, organized, though not as pretty) 

See how much space I have since purging and organizing?

P1030619

This is the left side of the cabinet.  I purged out a ton of large vases!  How many do I really need?  And, they are like a quarter at Goodwill if I ever want more!  I’d rather them store them than me.

P1030618

I am not totally thrilled with the slight curve in the little shelving stand I have, but it serves its purpose and it was free.  Found it in my garage.

I have a bunch of skinny, tall vases that I line up on the kitchen window sill that are always falling over so I put them in their own basket.  The short vases, are just that, short, so there was always a waste of vertical space.  They got their own basket.  Any other odd size vases got their own basket too.  I try not to let the fact that the two baskets on the left are blue, they were only a dollar each, just wish they were white.  I’ll be okay, though. Winking smile

P1030617

This little cutie patootie table was only $2!!  It was unmarked at a garage sale and I thought they might be asking $10 for it, and I was willing to pay $5.  Imagine my delight and inside squeals when the gentleman said $2!!  It was a country blue and painted very well, but you know how I feel about green!  I wanted to distress it like my headboard, but it was blue under the green, not white.  I did apply a light rubbing of stain over it to make it look a little more rustic.  It is so cute by the back door.  I came in from gardening the other day and set my seed basket on it, I think I’ll keep it there.  Looks kind of cute, don’t you think?

P1030624P1030622

On to the pantry!!!  One of my favorite spots in the house.  This is the rack that has been on the door since we moved in.  I have finally accumulated all the same size spice jars.  It has taken awhile to figure just what spices I use on a regular basis too.  I also  removed all the Costco size containers from the top shelf in put them in jars.  (except for that rogue bottle on the left, I really just want to throw it away)

P1030625

Doesn’t it look so cool to see all those labels???

P1030626

The top shelf here has the more commonly used spices in my house.  Italian seasoning, chili powder and cumin deserved larger jars.

I put a ‘sweeteners’ label on the shelf, as things never seemed to get returned to where they belong.

P1030627

This is the lower rack.  A spot for the oils, vinegar and the baking powder, soda, salt and cornstarch (which is really arrowroot, just haven’t changed the label) . . .

P1030629

On the bottom row I removed all the oddball boxes of tea and put them in jars.  Love it!

P1030630

On a tiny wall just inside the door I have these really cool square jars.  I bought them when we did the kitchen remodel six years ago.  I reorganized an repurposed them.

P1030242

P1030631

Oops, the millet jar is really popcorn.  The jar used to be used for millet, I just labeled the other side.  I have MY Tazo Cucumber White tea squeezed in between two jars.  I drink this every single morning, so it is in a convenient spot.  (right there next to chocolate chips, hmmmm)

P1030632

The bottom shelf in the pantry has baking supplies, flours and sugars.  I even made cutesy labels for the onion and potato baskets.  Did you get the idea that I love to label thing sin my home?  As far as I am concerned, an organizing project isn’t finished unless it’s labeled.  Just my opinion.

P1030241

Phew!  That was a long post!  I know there are more projects, this is just what I remembered today.  I will have to show you all we have done in the garden too.  That was the other huge Spring project.  Oh, and the guys are doing the roof as we had some leaks and it is nearly 25 years old.  Does it ever end?  Hope you enjoyed the tour.

Saturday, May 21, 2011

Trash To Treasure

I have been wanting a new headboard for a long time now.  I knew I wanted some type of ‘shutters’ for my headboard.  On one of our treasure hunting garage sale days I found an old bi-fold closet door for $2!  I knew if I cut them in half they would be perfect.

P1030399

It is no secret I adore GREEN (and purple), so I set about to find the perfect green.  Here is the before.

P1030400

The pictures do NOT do it justice.  I painted them with three coats of a gorgeous green and then sanded them in random places.  I then took some old stain we had and rubbed it on lightly.  I wiped off the excess and it was beyond beautiful!!!

P1030528P1030527

Here is the ‘after’ picture.  Aren’t they so, so cool!?

P1030526

I have been so busy with tons of projects around the house this Spring.  Lots of organizing, purging, painting, and gardening.  It has been such a busy, yet delightful time.  I hope to put up more pictures of the various projects I have been working on.  What have you been up to?

Wednesday, April 6, 2011

Organizing The Bathroom

While everyone has been sick and laying low, I have been organizing with a frenzy. I have been having a ball!  When we are doing school it is hard to find the time to put into re-organizing things, so I took advantage of the ‘off’ time.

This the upper bathroom cabinet before re-organizing.  Not bad to start with, but I was inspired to kick it up a notch.

P1050740

Before picture of the lower cabinet.

P1050741

This cabinet has been my nemesis for years.  It is where we keep our table clothes and pillowcases.  It is ALWAYS a mess, and frankly, I have no idea why I didn’t do something about it sooner!  Oh, yeah, Adrenal ExhaustionWinking smile.  Healed now, though, remember!!!???

P1050742

Before under the sink.


P1050743

Last cabinet before picture.

P1050746

Some tips that I have always tried to follow when organizing are:

  • measure your space and find the perfect containers to FILL the space.  You don’t want to waste any space.
  • pull everything out and only put back what you really want.
  • be ruthless with your purging, do you really need 4 curling irons??  3 different kinds of gel when you don’t even use gel?  I think not.  Toss it!
  • group like items together
  • use smaller containers within the bigger ones to keep things tidy.

Here are the ‘after’ pictures!  I put darling old fashioned scrapbook paper inside the boxes and printed new labels on clear sticker paper. 


P1050747

Here is a close up of the paper and the label.

P1050752

Too cute!

P1050754

The lower cabinet always had towels tumbling out.  Yesterday I measured and re-measured and hopped on Amazon and found the perfect size containers to fill my space as completely as I could.  Now all the towels, tablecloths and bedding fit neatly and perfectly in the containers.  I purged out all the old, raggy towels that don’t get used anyway.

P1050755

A nice basket for diapers and pull-ups.  An out of the way place for lotion making supplies, the scale (which I am convinced should be thrown into the deepest ocean, but that’s another story) and heating pad/packs.

P1050756

Under the sink was organized and purged.

P1050758

Purged out hair product container, and a few extra things.

P1050759

Not bad for a days work, is it?  Have you been organizing this Spring?